Daylight Saving Time Setup
Creation date: 12/19/2018 3:12 PM
Updated: 10/20/2023 7:29 AM
https://youtu.be/slfhMzCPthE
Walkthrough Text:
This process is identical for either the beginning or end of Daylight Savings Time. The setup entails checking one setting in Windows, and performing one test in SMARTTime.
Setting Windows
Perform the following steps on all computers with SMARTTime installed.
Testing SMARTTime
It’s important to take this step after the official change in time. It’s also optimal to do this before students next clock in, to avoid needing manual punch corrections.
Walkthrough Text:
This process is identical for either the beginning or end of Daylight Savings Time. The setup entails checking one setting in Windows, and performing one test in SMARTTime.
Setting Windows
Perform the following steps on all computers with SMARTTime installed.
- Click on your clock interface (normally in the bottom right corner of your desktop)
- Click Change date and time settings…
- On the Date and Time pop up window, select Change time zone…
- On the Time Zone Settings pop up, ensure the box marked Automatically adjust clock for Daylight Saving Time is checked. If it’s not checked, check it. If it is checked, leave it and move to the next step.
- Click OK on both pop ups
Testing SMARTTime
It’s important to take this step after the official change in time. It’s also optimal to do this before students next clock in, to avoid needing manual punch corrections.
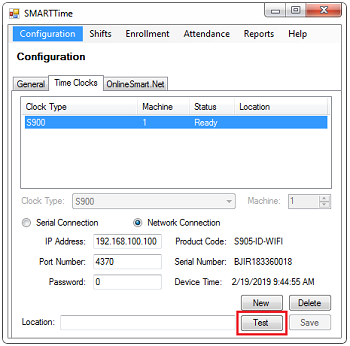
- In SMARTTime go to Configuration and select the Time Clocks tab
- Click on your Clock Type in the upper window to highlight it
- If you have more than 1 time clock, perform these steps for each of them
- Click the Test button
- Once you get the confirmation pop up, your time clock’s time will be updated to match your computer’s time. SMARTTime is now ready for Daylight Savings!
DataImage72.png
Daylight Savings Time Instructions.oft